|
|
|
1. INTRODUCTION |
|
In this WWW page we will be looking at Graphical User Interfaces (GUIs). However, to understand GUIs we must first understand two (three?) other important Java concepts:
|
These will be discussed first in Sections 2, 3 and 4, we will then go on to the interesting stuff in the remainder of this page. The four GUI examples given follow on from one another, starting with a very simple example and then building onto this with subsequent material. |
2. ABSTRACT METHODS |
|
Consider the class hierarchy given in Table 1. Here we have a TopClass which has a constructor and a field numX. This class has two subclasses, ClassOne and ClassTwo, both of which have a method called function1 whose signatures (heads) are identical but whose bodies differ --- one divides numX by 2 and the other by 3. Figure 1 presents a class diagram illustrating the class hierarchy associated with these classes. |
An application class which makes use of the classes in the hierarchy is presented in Table 2; some sample output is given below:
$ java AbstractExApp
object1.getNumX()
    (after object1.function1(2) call)
    = 14

object2.getNumX()
    (after object2.function1(2) call)
    = 12
|
// Abstract Example Classes - ClassOne
// Frans Coenen
// 10 March 2000
// Dept Computer Science, University of Liverpool

class TopClass {
    // ----------- FEILDS ----------

    protected int numX;

    // ----------- CONSTRCTURS ----------

    public TopClass(int value) {
    	numX = value;
	}

    // ----------- METHODS ----------

    /* Get numX */

    public int getNumX() {
        return(numX);
	}
    }

class ClassOne extends TopClass {

    // ---------- CONSTRCUTORS ----------

    public ClassOne(int value) {
    	super(value);
	}

    // ----------- METHODS ----------

    /* Function 1 */

    public void function1(int numY) {
        numX = numX+numY;
	}
    }

class ClassTwo extends TopClass {

    // ---------- CONSTRCUTORS ----------

    public ClassTwo(int value) {
     	super(value);
	}

    // ------------ METHODS -------------

    /* Function 1 */

    public void function1(int numZ) {
        numX = numX*numZ;
	}
    }
|
Table 1: Example Class Hierarchy

Figure 1: Class diagram for class hierarchy presented in Table 1.
// Abstract Example application
// Frans Coenen
// 9 March 2000
// Dept Computer Science, University of Liverpool

class AbstractExApp {

    // ------------------ METHODS ------------------------

    /* Main method */

    public static void main(String[] args) {

	// Create instance of ClassOne and ClassTwo

	ClassOne object1 = new ClassOne(12);
	ClassTwo object2 = new ClassTwo(6);

	// Output

	object1.function1(2);
	System.out.println("object1.getNumX() " +
	                  "(after object1.function1(2) call) = " +
	                                object1.getNumX() + "\n");
	object2.function1(2);
	System.out.println("object2.getNumX() " +
	                  "(after object2.function1(2) call) = " +
	                  object2.getNumX() + "\n");
	}
    }
|
Table 2: Application class for code presented in table 1.
|
Given this situation it would be nice if we could define the head of the function1 method (i.e. its signature) in the TopClass and the appropriate implementational detail (i.e. the body) in the sub-classes. Java provides a means of doing this by allowing us to define, in the TopClass, what is known as an Abstract method. An abstract method is one that is defined by its signature only, i.e. it has no body. The implementational detail for the method, i.e. the body, are supplied by the sub-classes of the class in which the method is defined according to the nature of each sub-class. We indicate such a method to the compiler using the keyword abstract. Thus in the above example we could include, in the TopClass, the method: |
abstract public void
              function1(int dummy);
An abstract method can be thought of as a "template" or "blueprint" for a method whose implementational details are contained in the sub-classes of the class in which the abstract method is defined. The implementational detail is included in the normal way so no changes need to be made to the definition of ClassOne or ClassTwo (see Table 1) in our example. In effect the abstract method is overriden by the full method definitions contained in the sub-classes. Much use is made of abstract methods when creating GUIs. |
|
If we wish to create an instance of a sub-class we (obviously) must use the constructor for this class. When invoked Java will also call the constructors for all the super-classes of thge sub-class in question starting with the base-class constructor, and working down to the sub-class in question. This works fine provided that we only wish to invoke zero-argument (default) constructors. However, in the example given in Table 1 the constructor has an argument! |
The question is then "how do we get the required argument to this constructor?" The answer is that we use the super keyword as illustrated in the above code. The keyword super thus allows us to make use of the constructor defined in the super class, and thus (in the above case) we can cause a value to be assigned to the numX data member defined in the super-class. Note that when using the reserved word super it must always be the first statement in the constructor body. |
3. ABSTRACT CLASSES |
|
An abstract class is one that is identified by the keyword abstract. An abstract class does not have to contain an abstract method, however, a class that does contain at least one such method is considered to be an abstract class and must therefore be identified using the keyword abstract (otherwise it will not compile). Similarly an abstract class can contain methods that are not abstract. Thus if we include an abstract method in our TopClass presented in Table 1, TopClass will become an abstract class and thus must be declared as such. A revised version of the TopClass definition, as an abstract class, is presented in Table 3. |
Note that it is not possible to create instances of an abstract class (as there will be no means of implementing the abstract methods it may contain). Similarly an instance of a sub-class of an abstract class can only be created if any abstract methods in the super-class are overridden in the sub-class definition. If not the sub-class should also be defined as an abstract class. It is quite possible to program in Java without resorting to abstract classes, however they are a feature of the Java API and thus any student of Java should at least be aware of the existence of such a thing! With respect to creating GUIs there usage, as we will see, is unavoidable. |
// Abstract Example Classes - ClassOne
// Frans Coenen
// 10 March 2000
// Dept Computer Science, University of Liverpool

abstract class TopClass {
    // ----------- FEILDS ----------

    protected int numX;

    // ----------- CONSTRCTURS ----------

    public TopClass(int value) {
    	numX = value;
	}

    // ----------- METHODS ----------

    /* Abstract method function1 */

    abstract public void function1(int dummy);

    /* Get numX */

    public int getNumX() {
        return(numX);
	}
    }

--- Definitions for ClassOne and ClassTwo as before ---
|
Table 3: Revised example class hierarchy to that presented in Table 1
4. INTERFACES |
|
From previous work we have seen that classes are typically arranged in a class hierarchy such that classes lower down the hierarchy inherit methods and attributes from their super classes (Figure 2). In Java inheritance is a one-to-one relationship, a class can only be a sub-class of (i.e. inherit from) one super class, although several sub-classes can inherit from the same super class. Java does not support multiple inheritance (Figure 3). |
However, the effect of multiple-inheritance can be achieved using an interface (Figure 4). An interface is an abstract class that contains only abstract methods and/or constants. Thus the interface supplies a specification of methods which must be implemented by a sub-class of the interface, we say that the subclass implements the interface. Interfaces are another important element when creating GUIs. |

Figure 2: Class hierarchy.

Figure 3: Multiple inheritance (not supported in Java).

Figure 4: Java interface to produce "multiple inheritance like" behaviour.
5. OVERVIEW OF GUIs |
|
A Graphical User Interface (GUI) is an interface between a user and a computer that makes use of devices such as windows, menus and buttons to facilitate input. In Java a GUI comprises a set of components which are placed in a container (e.g. a window or frame). Components cannot be displayed outside of a container. To create a GUI the classes in the awt package that comes with the Java API are typically used. A partial class diagram illustrating the interconectivity between some of the classes found in the awt package is presented in Figure 5. Note that the ActionListener and WidowListener "classes" are interfaces. From Figure 5 it can be seen that Component is the parent class of different types of component, such as buttons, as well as containers of different forms. Four methods are given for the Component class in Figure 5 (there are more):
|
The class Container (in Figure 5) gives two methods:
Remember that the components cannot be displayed separately on the screen, but must be placed in a container. Note also, referring to the class diagram presented in Figure 5, that:
|

Figure 5: Partial class hierarchy of contents of java.awt package
6. FIRST EXAMPLE (GUI WITH "PUSH BUTTON") |
|
We create a GUI by first creating a container. We do this by defining a class that extends the class Container or some sub-class of this class such as the class Frame. In the following examples we will give this class the name Gui. There are essentially three steps to creating a simple GUI:
|
Some code to produce a simple example GUI is presented in Table 4; an application class to accompany this class is included in Table 4 (the result is given in Figure 6). Note:
|
// GUI Example 1
// Frans Coenen
// Wednesday 19 September 2001
// Dept. of Comp. Sci., University of Liverpool

import java.awt.*;

class Gui extends Frame {

    // ------------------------ FIELDS -------------------------

    /* Buttons */

    Button pushButton = new Button("START");

    /* Constructor */

    public Gui(String text) {
        super(text);
	setBackground(Color.yellow);
	setLayout(null);

	// Add push button

        addPushButton(pushButton,200,50,100,40);
        }

    /* Add push button */

    private void addPushButton(Button name, int width,
                int height, int xCoord, int yCoord) {
        name.setBackground(Color.red);
	name.setForeground(Color.black);
	name.setLocation(width,height);
	name.setSize(xCoord,yCoord);
	add(name);
	}
    }

/* APPLICATION CLASS

class GuiEx1 {

    /* Main  method */

    public static void main(String[] args) {
        Gui screen = new Gui("GUI Example 1");

	screen.setSize(500,125);
	screen.setVisible(true);
        }
    }
|
Table 4: GUI example 1

Figure 6: GUI example 1 output
7. HANDLING EVENTS |
|
In the example presented above nothing happens when we click on the button. This is because we have not included anything in the code, to (a) detect a mouse click or (b) do anything about it. Occurrences such as mouse clicks are called events. To detect such an event we need to include an appropriate event listener. Different components have different listeners associated with them:
There are also other sorts of listener, for example mouse listeners. The different kinds of listener are described by a set of interfaces which in turn implement the EventListener interface (see Figure 5). Thus in the case of our button component we need to include an action listener. We do this with a call to the addActionListener method found in the Button class. Note that the argument to this method is the calling instance, we indicate this using the keyword this. |
When an action event is detected by the action listener the actionPerformed() method contained in the ActionListener interface is automatically invoked. However, because ActionListener is an interface, we must implement this method in our Gui class. Note (from Figure 5) that this method is called with a single argument which must be an instance of the class ActionEvent. Such an instance is created automatically on detection of an action event. Thus to summarise, to react to a button press we must do the following:
Some sample code which sounds a "beep" (unicode \u0007) when the button is pressed is presented in Table 5 where the highlighted parts of the code indicate additions to the example presented in Table 4. |
// GUI Example 2
// Frans Coenen
// Wednesday 19 september 2001
// Dept. of Comp. Sci., University of Liverpool

import java.awt.*;
import java.awt.event.*;

class Gui extends Frame implements ActionListener {

    // ----------------------- FIELDS --------------------------

    /* Buttons */

    Button pushButton = new Button("START");

    /* Constructor */

    public Gui(String text) {
        super(text);
	setBackground(Color.yellow);
	setLayout(null);

	// Add push button

        addPushButton(pushButton,200,50,100,40);
        }

    /* Add push button */

    private void addPushButton(Button name, int width,
                           int height, int xCoord, int yCoord) {
        name.setBackground(Color.red);
	name.setForeground(Color.black);
	name.setLocation(width,height);
	name.setSize(xCoord,yCoord);
	add(name);
	name.addActionListener(this);
        }

    /* Action Performed */

    public void actionPerformed(ActionEvent event) {
        final char BELL = '\u0007';

	if (event.getActionCommand().equals("START"))
                                        System.out.print(BELL);
	}
    }

/* APPLICATION CLASS

class GuiEx2 {

    /* Main  method */

    public static void main(String[] args) {
        Gui screen = new Gui("GUI Example 2");

	screen.setSize(500,125);
	screen.setVisible(true);
        }
    }
|
Table 5: GUI Example 2
8. CLOSING A WINDOW |
The usual way of closing a window is by selecting a "close" option from a menu or by clicking on the close icon (top right hand corner of the title bar). Considering only the second option we need to include a method to monitor the window. In otherwords we must add a window listener to our code. The class Window contains an appropriate method to do this, addWindowListener, which operates in a similar manner as the addActionListener used to monitor the button component in the previous example. When the close icon is pressed this then invokes the windowClosing method contained in the WindowListener interface. Again because this is an interface, we need to implement this method in our code, we also need to provide rudimentary implementations for the other abstract methods contained in this interface (Figure 5). Note that the single argument to all of the WindowListener interface methods is an instance of the class WindowEvent. Some appropriate example code illustrating the above is presented in Table 6.
// GUI Example 3
// Frans Coenen
// Wednesday 19 September 2001
// Dept. of Comp. Sci., University of Liverpool

import java.awt.*;
import java.awt.event.*;

class Gui extends Frame implements ActionListener,
                                              WindowListener {

    // ---------------------- FIELDS -------------------------

    /* Buttons */

    Button pushButton = new Button("START");

    /* Constructor */

    public Gui(String text) {
        super(text);
	setBackground(Color.yellow);
	setLayout(null);
	addWindowListener(this);

	// Add push button

        addPushButton(pushButton,200,50,100,40);
        }

    /* Add push button */

    private void addPushButton(Button name, int width,
                         int height, int xCoord, int yCoord) {
        name.setBackground(Color.red);
	name.setForeground(Color.black);
	name.setLocation(width,height);
	name.setSize(xCoord,yCoord);
	add(name);
	name.addActionListener(this);
        }

    /* Action Performed */

    public void actionPerformed(ActionEvent event) {
        final char BELL = '\u0007';

	if (event.getActionCommand().equals("START"))
                                       System.out.print(BELL);
	}

    /* Close window method */

    public void windowClosing(WindowEvent event) {
        System.exit(0);
	}

    /* Other window listeners etc. */

    public void windowClosed(WindowEvent event) {}
    public void windowDeiconified(WindowEvent event) {}
    public void windowIconified(WindowEvent event) {}
    public void windowActivated(WindowEvent event) {}
    public void windowDeactivated(WindowEvent event) {}
    public void windowOpened(WindowEvent event) {}
    }

/* APPLICATION CLASS

class GuiEx3 {

    /* Main  method */

    public static void main(String[] args) {
        Gui screen = new Gui("GUI Example 3");

	screen.setSize(500,125);
	screen.setVisible(true);
        }
    }
|
Table 6: GUI example 3 (with window listener)
9. TEXT FIELDS |
Text fields are components into which we can write text or display text. In the first case we normally wish to "collect" the text and do something with it. Some sample code is given in Table 7 that makes use of text fields. Things to note concerning the example:
Some sample output is presented in Figure 7.
// GUI Example 4
// Frans Coenen
// Wednesday 29 March 2000
// Dept. of Comp. Sci., University of Liverpool

import java.awt.*;
import java.awt.event.*;

class Gui extends Frame implements WindowListener, ActionListener {

    // ----------------------- FIELDS -------------------------

    /* Text Fields */

    TextField input1 = new TextField(10);
    TextField input2 = new TextField(10);
    TextField output = new TextField(10);

    /* Buttons */

    Button pushButton = new Button("START");

    /* Other fields */

    private final int WIDTH  = 100;
    private final int HEIGHT = 30;
    private int dataItem1    = 0;
    private int dataItem2    = 0;

    // --------------------- CONSTRUCTORS ---------------------

    public Gui(String text) {
        super(text);
        setBackground(Color.yellow);
        setLayout(null);
	addWindowListener(this);

        // Add Text Fields

        addTextField(input1,100,50);
        addTextField(input2,300,50);
        addTextField(output,200,150);
        output.setEditable(false);

        // Add push button

        addPushButton(pushButton,200,100);
        }

    // -------------------------- METHODS -----------------------

    /* Add text field*/

    private void addTextField(TextField name, int xCoord,
                                                    int yCoord) {
        name.setBackground(Color.red);
	name.setForeground(Color.black);
	name.setLocation(xCoord,yCoord);
	name.setSize(WIDTH,HEIGHT);
	add(name);
	name.addActionListener(this);
        }

    /* Add push button */

    private void addPushButton(Button name, int xCoord,
                                                    int yCoord) {
        name.setBackground(Color.red);
	name.setForeground(Color.black);
	name.setLocation(xCoord,yCoord);
	name.setSize(WIDTH,HEIGHT);
	add(name);
	name.addActionListener(this);
        }

    /* Action Performed */

    public void actionPerformed(ActionEvent event) {

        // Get Action

        String data = event.getActionCommand();

	// Test for push Button or text field

	if (event.getSource() == pushButton) {
	    output.setText(dataItem1 + " + " + dataItem2 +
                       " = " + (dataItem1+dataItem2));
            }

	else if (event.getSource() == input1)
                   dataItem1 = (new Integer(data)).intValue();
        else dataItem2 = (new Integer(data)).intValue();
        }

    /* Window listeners etc. */

---- As before ----

    }

/* APPLICATION CLASS  */

class GuiEx4 {

    /* Main  method */

    public static void main(String[] args) {
        Gui screen = new Gui("GUI Example 4");

	screen.setSize(500,220);
	screen.setVisible(true);
        }
    }
|
Table 7: GUI Example 4
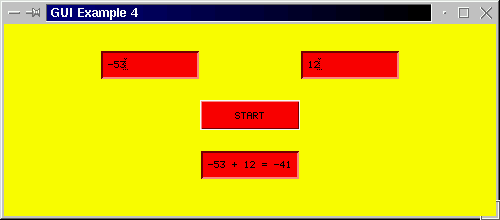
Figure 7: GUI example 4 output
Created and maintained by Frans Coenen. Last updated 07 September 2001